CakeDC Blog

TIPS, INSIGHTS AND THE LATEST FROM THE EXPERTS BEHIND CAKEPHP

10 guidelines to outsourcing web development


One issue that has recently attained center stage in the business world is the debate over whether outsourcing web development is a good business strategy or not.

Proponents point among other things to local shortage of highly qualified web developers and to cost savings. Critics on the other hand remain skeptical and often point to the potential loss of control over some aspects of a company’s business processes that outsourcing requires. To add to the dilemma, some use the term interchangeably with offshoring.

So let us begin by defining exactly what outsourcing is and how it differs from offshoring.

Outsourcing is a general term used to describe the act of delegating an entire business function or part of a business process to a third party or contractor. Despite its techie-sounding name, the idea of outsourcing, is a very ordinary one.

When you don’t have money, you borrow from those that have it and when you lack talent or experience in one area, you seek it from those that have it. That is what outsourcing is all about.

Businesses outsource when they determine that they either do not have the expertise they need to accomplish a given objective or, when they just want to maximize benefits and reduce cost. Outsourcing allows businesses to lower costs, take advantage of skilled experts, and to increase productivity and efficiency. Unlike offshoring, it does not imply work done in a different country and therefore does not entail the same risks inherent in offshoring such as project delivery failures due to political unrest, poor communication, and language barriers in the contractor’s country.


In this article, we will focus on outsourcing web development as a major business venture that should be carefully planned and executed.

Here are 10 guidelines to help you outsource web development successfully.

1. The first thing you need to do before even considering who to partner with for your outsourcing needs is to specify exactly what business objective you want fulfilled with the finished website. Will the website be a fully functional, highly interactive website where people can conduct commercial transactions at all times of the day or will it used to simply list detailed information about the business? Do you expect the website to evolve at some point or will this development be the final rendition? In general, most websites evolve in response to changing business demands. So it is wiser to plan ahead with changes in mind. Having a clear vision of what you want the website to do for you will help the contractor and you to tailor the project to the specific long term goals of your business.

2. After defining the general business objective, consider what functionality you want the website to provide. Will the website or some parts of it require a secure login? If so, what will be the requirements or access levels? Will the website include an online demo or a forum? How about databases and calculations?

3. Specify exactly how you will measure success. The main reason why you would develop a website in the first place is to enable people to do certain tasks at your website. So you need a way to measure this and a means to evaluate success or failure when the contractor completes the project. There are many tools you can use including one free one: Google Analytics.

4. Research similar sites. Visit websites of businesses that have already created sites similar to the one you are envisioning. The goal is not to simply copy or emulate them but to learn from them. Examine the design and functionality of these websites and write your impressions about what you like and what you don’t like about them. You can also request friends or other dis-interested parties to visit these sites and give you their opinions. Additionally, read customer comments (if available) and carefully note what problems users complain about and what they like or do not like about such websites. With this knowledge under your belt, you can then craft a better website that avoids the common pitfalls and incorporates all the features visitors find valuable. This will give you a definitive edge over your competitors.

5. Prioritize your needs. It is not always possible to include all the things you want in a website due to budget, time, and other constraints. It is therefore important to begin by categorizing your needs into “must haves” and “wish to haves.” Then make sure you consider optional features only after you have budgeted for those features that you absolutely must have.

6. Prepare a brief or summary for prospective contractors. This should include a short introduction of your company; what it does; and what its overall goals are. The brief should also include the purpose of the website; who the target audience will be; anticipated functionality (ecommerce, advertising etc…); how you will evaluate success; and who will be responsible for creating and maintaining content. You should also state whether you will be doing maintenance in-house or expect the contractor to do it for you.

7. After you have completed the above steps, it is time to look for a business partner. Make phone calls to several businesses who have the expertise you need and then draw up a list of those that meet the criteria you set in your brief (step #6 above). You can then send your brief to the few you have selected along with a request for a proposal. When you receive a proposal, look over its provisions very carefully. It is more important particularly at this stage to make sure that you get the most important features you identified in step #4. Price is important of course but don’t make the mistake of focusing only on cost. Though cost saving is a major reason for outsourcing, it should never be at the expense of quality. Moreover, a well developed site will save you more money in the long run than a mediocre site.

8. Ask prospective contractors for details about the staff that will be handling your project. If you will be outsourcing the entire web development life cycle, you want to know if subject-matter experts will be managing each phase of the project. In other words, you want to know if the task will be divided in such a way that dedicated web design specialists will be doing the design phase while software developers will handle the nuts and bolts of software development.

It should be noted here that there are some web developers who are also excellent web designers and vice versa. This should not be a problem and in fact can be preferable because such an expert can match development to design more easily to create a well-balanced and harmonious website.

9. Discuss a timeline for in-person or electronic progress report. How often will the prospective contractor provide you with a progress report? Does their proposal give a phased outline of what will be accomplished when? If they can’t provide a reasonable response to this, look elsewhere.

10. Finally, ask for references and check them thoroughly. Inquire about their customer service, their task completion history, and their general professionalism.


If you follow the above steps faithfully, you will be rewarded with the proven cost-saving benefits of outsourcing. Carefully managed and executed, outsourcing is a strategic business move and a great boon to all types of businesses.

Latest articles

Build a Single Page Application Using CakePHP and InertiaJS

Build a Single Page Application using CakePHP and InertiaJS

  The Inertia Plugin allows a CakePHP application to integrate Vue 3 components in the front end, without the need to write a specific API for data transfer. This is done  by adding a Middleware and view classes that facilitate the conversion of objects and data in JSON almost automatically, as well as the direct load in the components. The plugin is thought of as a base to extend and use your app’s specific controllers and views from. Just because  it works out of the box doesn't mean it is intended to be used exactly as is,  but this will  provide you a good kick start. See the repo here: https://github.com/CakeDC/cakephp-inertia

Requirements

  • CakePHP 4.5
  • PHP >= 8.1
  • NodeJS 18.9 (only for build Vue Components, not required on running site)


Step 1: Create a basic CakePHP install

  For this example I will use a basic installation using Docker and Composer.  First you must create project from cakephp/app  
$> composer create-project --prefer-dist cakephp/app:~4.5 inertia_app $> cd inertia_app $> cp config/app_local.example.php config/app_local.php
  Then write an docker-compose.yml file as:
version: '3' services:   psql13:     image: postgres:13     container_name: inertia-app-postgres13     volumes:       - ./tmp/data/inertia-postgres13__db:/var/lib/postgresql:delegated     environment:       - POSTGRES_USER=my_app       - POSTGRES_PASSWORD=secret       - POSTGRES_DB=my_app       - PGUSER=my_app       - PGDATABASE=my_app       - PGPASSWORD=secret     ports:       - '7432:5432'     cakephp:     image: webdevops/php-nginx:8.1     container_name: inertia-app-cakephp     working_dir: /application     volumes:       - ./:/application:cached       - ~/.ssh:/home/application/.ssh:ro     environment:       - WEB_DOCUMENT_ROOT=/application/webroot       - DATABASE_URL=postgres://my_app:secret@inertia-app-postgres13:5432/my_app     ports:       - "9099:80"
  Launch the container and go to http://localhost:9099/  
$> docker-compose up -d
 

Step 2: Add CakePHP Inertia plugin

  Install plugin via command line:
$> composer require cakedc/cakephp-inertia
  Once installed enable it in src/Application.php, adding at the bottom of bootstrap function:
$this->addPlugin('CakeDC/Inertia');
  or by command line:
$> bin/cake plugin load CakeDC/Inertia


Step 3: Create Vue App and install it

  To create Vue App type in command line:
$> bin/cake create_vue_app
  This command create in the resources directory the files that use our App, also create in root directory the files:
  • webpack.mix.js
  • package.json
  Then in root directory install with NPM:
$> npm install


Step 4: Create simple SPA (Single Page Application)

  Create a single page called dashboard that show values sets in a controller action We need to first add InertiaResponseTrait  
use CakeDC\Inertia\Traits\InertiaResponseTrait;   class PagesController extends AppController {    use InertiaResponseTrait;    ...  ...   }
  Create a new function that would look like this:
public function dashboard() {   //set default php layout of plugin that use vue   $this->viewBuilder()->setTheme('CakeDC/Inertia');     $page = [       'text' => 'hello world 1',       'other' => 'hello world 2',   ];   $this->set(compact('page')); }
  in config/routes.php uncomment lines to catch all routes:
$builder->connect('/{controller}', ['action' => 'index']); $builder->connect('/{controller}/{action}/*', []);
and comment line:
$builder->connect('/pages/*', 'Pages::display');
  Then create file resources/js/Components/Pages/Dashboard.vue that would look like this:
<script setup> import Layout from '../Layout' import { Head } from '@inertiajs/vue3' import {onMounted} from "vue";   defineProps({     csrfToken: String,     flash: Array,     page: Array, })     onMounted(() => {     console.log('Component Dashboard onMounted hook called') }) </script>   <template>     <Layout>         <Head title="Welcome" />         <h1>Welcome</h1>         <p>{{page.text}}</p>         <p>{{page.other}}</p>     </Layout> </template>
  On root directory execute:
$> npm run dev
  IMPORTANT: Whenever you modify the .vue templates, you must run this script. Go to http://localhost:9099/pages/dashboard to see that Dashboard Vue Component prints values assignments on Dashboard CakePHP function.


Step 5: Bake CRUD system

  For this example, we use sql file on config/sql/example/postgresql.pgsql   That creates a database with the relations     
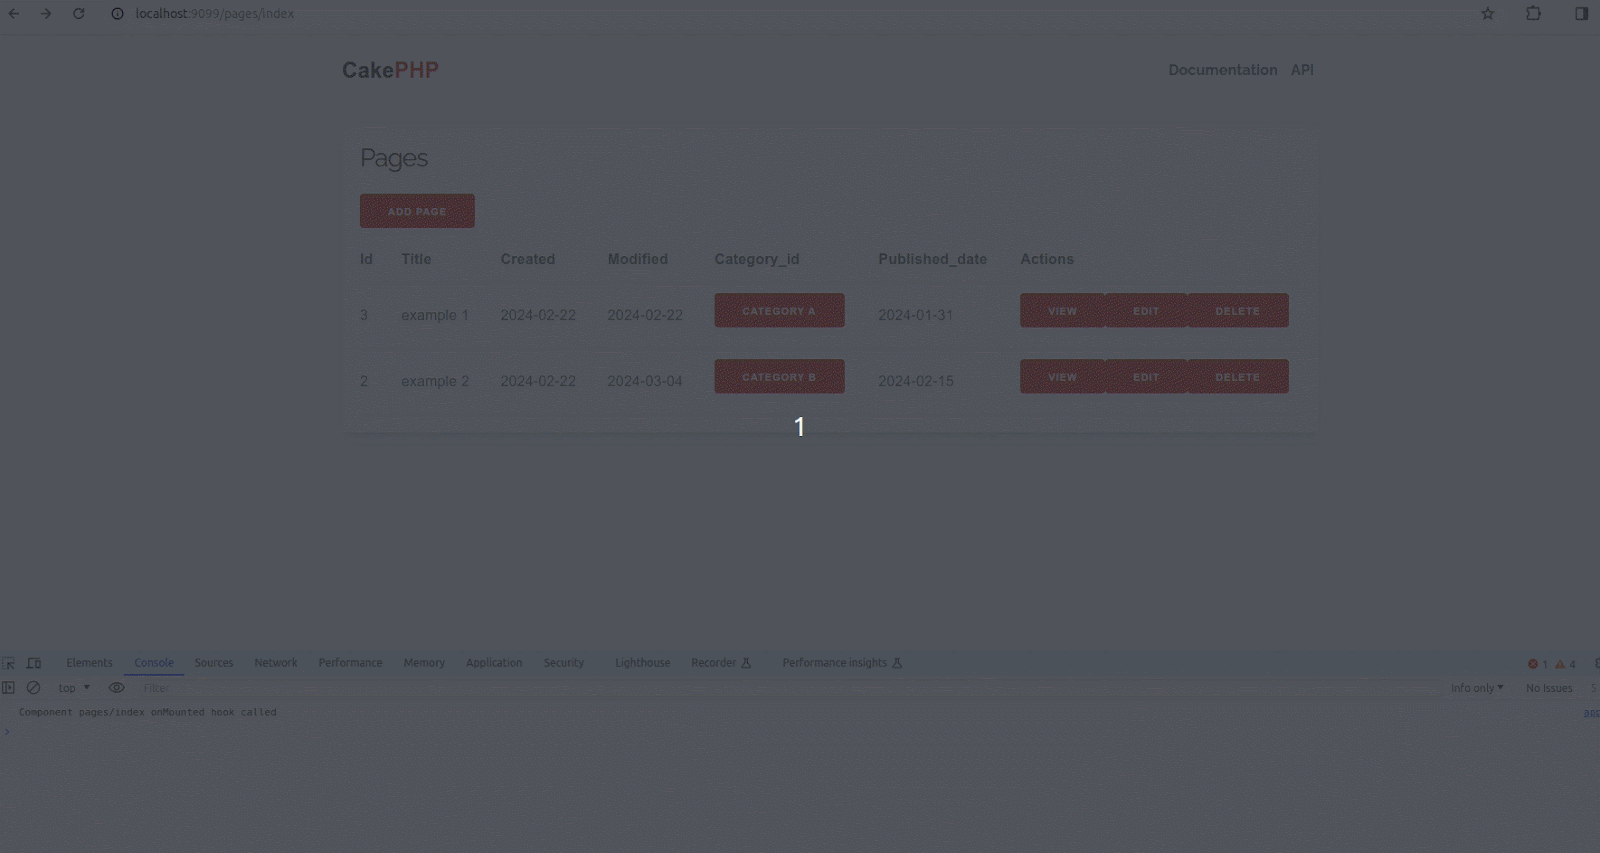
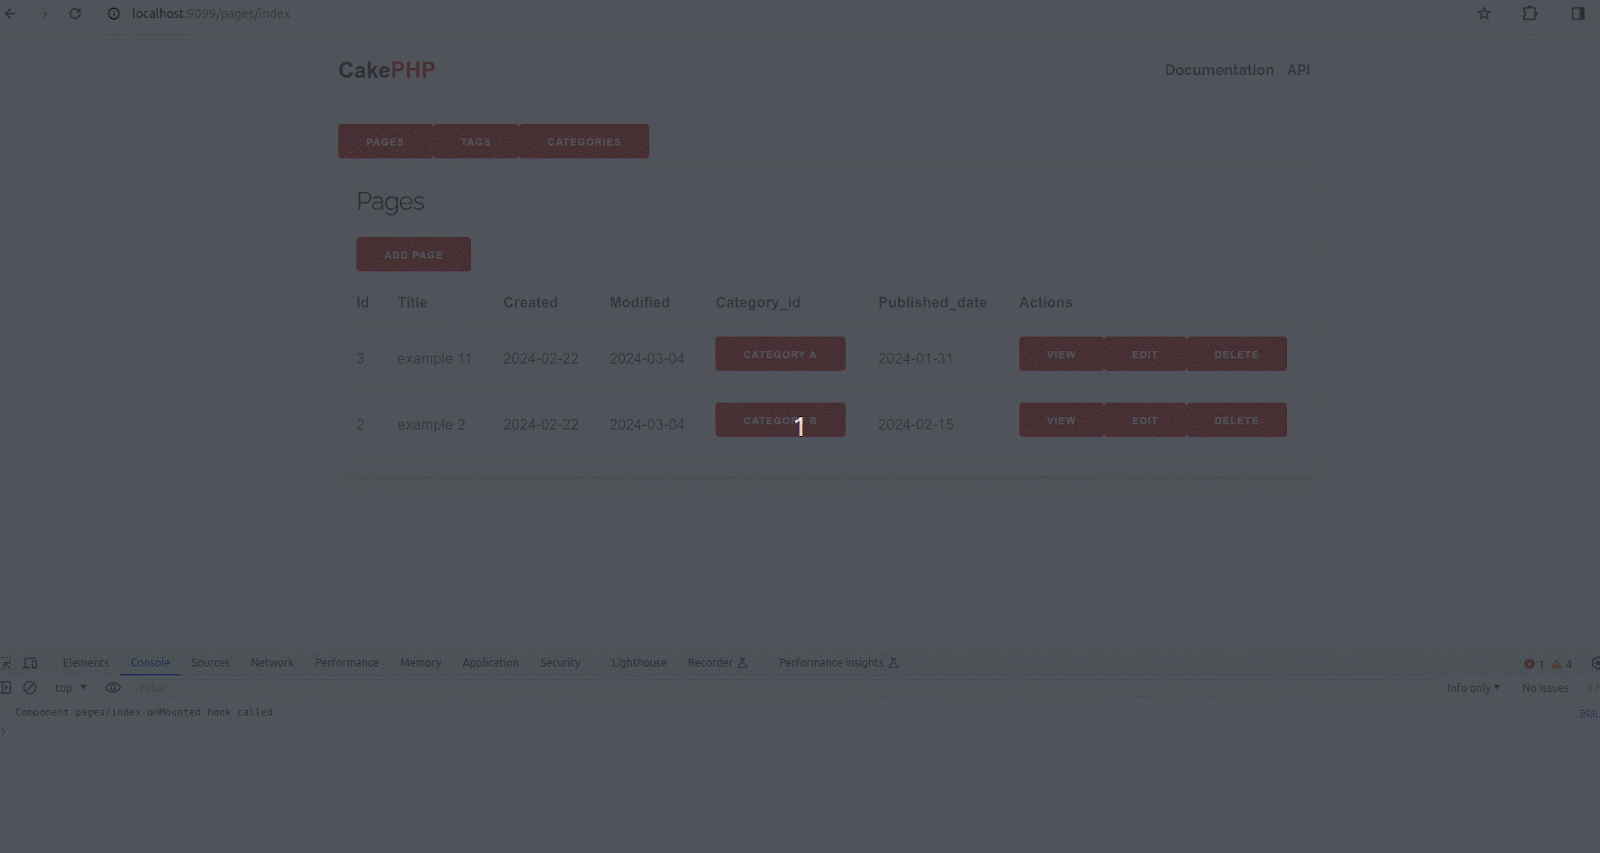
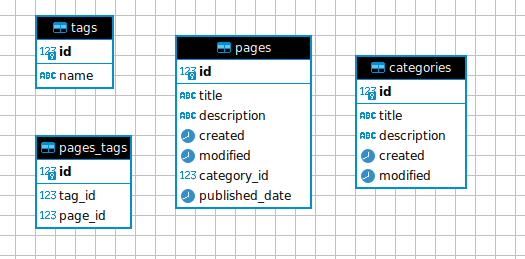
Once the database has been created, bake models and controllers as normal using:
$> bin/cake bake model Pages --theme CakeDC/Inertia $> bin/cake bake controller Pages --theme CakeDC/Inertia $> bin/cake bake model Tags --theme CakeDC/Inertia $> bin/cake bake controller Tags --theme CakeDC/Inertia $> bin/cake bake model Categories --theme CakeDC/Inertia $> bin/cake bake controller Categories --theme CakeDC/Inertia
  and bake templates using vue_template instead of template as:
$> bin/cake bake vue_template Pages --theme CakeDC/Inertia $> bin/cake bake vue_template Tags --theme CakeDC/Inertia $> bin/cake bake vue_template Categories --theme CakeDC/Inertia
  Again run:
$> npm run dev
  You can the results from this example by going to http://localhost:9099/pages/index   In the following recording you can see how to add, edit and delete a record without reloading the page at any time.


Step 6: Using prefix and adding a navigation menu

  Add route to prefix Admin on config/routes.php
$builder->prefix('admin', function (RouteBuilder $builder) {    $builder->fallbacks(DashedRoute::class); });
  To generate controllers and template with a prefix use --prefix option of bake command as:
$> bin/cake bake controller Pages --prefix Admin --theme CakeDC/Inertia $> bin/cake bake controller Tags --prefix Admin --theme CakeDC/Inertia $> bin/cake bake controller Categories --prefix Admin --theme CakeDC/Inertia $> bin/cake bake vue_template Pages --prefix Admin --theme CakeDC/Inertia $> bin/cake bake vue_template Tags --prefix Admin --theme CakeDC/Inertia $> bin/cake bake vue_template Categories --prefix Admin --theme CakeDC/Inertia
  You can add a horizontal menu to navigate through controllers   Edit resources/Components/Layout.vue and put inside header tag links as:
<header>    <Link as="button" href="/pages/index" class="button shadow radius right small">Pages</Link>    <Link as="button" href="/tags/index" class="button shadow radius right small">Tags</Link>    <Link as="button" href="/categories/index" class="button shadow radius right small">Categories</Link> </header>
  Again run:
$> npm run dev
  You can see the results from this  example by going to http://localhost:9099/admin/pages/index   In the following recording you can see how to add, edit and delete a record without reloading the page at any time and navigate through pages, tags and categories.

  Hopefully this example will make your experience easier! Let us know: [email protected].

When and why should you upgrade to CakePHP 5?

CakePHP 5.0.0 was released on September 10th. The current version as of today is 5.0.3 (released Nov 28th and compatible with PHP 8.3 https://github.com/cakephp/cakephp/releases/tag/5.0.3). You might be asking yourself some questions related to the upgrade… here's what we've been recommending to our clients to do since version 5 was released. Leaving aside the obvious reasons for an upgrade, today we're going to categorize the decision from 2 different points of view: Your current CakePHP version, and your role in the project.

When should you upgrade? 

  We are going to use current CakePHP version as the main criteria: * If you are in CakePHP <= 2   * We strongly recommend an upgrade as soon as possible. If you are unable to upgrade, try to keep your PHP version and all the underlying dependencies as fresh as you can and isolate the application as much as possible. If your application is internal, consider using a VPN blocking all outside traffic. If your site is open to the public, consider using an isolated environment, hardened. Adding a web application firewall and a strict set of rules could also help to mitigate potential security issues. Even if CakePHP is very secure, the older versions of CakePHP, like  1 and 2  have a very old code base , and other vendors/ libraries could be a serious security risk for your project at this point.   * If you are in CakePHP 3.x   * The effort to upgrade at least to CakePHP 4.x should not be a blocker. We would recommend upgrading at least to the latest CakePHP 4.5.x. You can actually "ignore" the deprecations for now, you don't need to plan for upgrading your authentication/authorization layers just yet, focus on getting your project stable and up to CakePHP 4.5.x in the first round.   * If you are in CakePHP 4.x   * Upgrading to CakePHP 5.x is not an immediate priority for you.   * I would say, 2024 is a good time to start planning for an upgrade. Feature and bugfix releases for 4.x will continue until September 2025. Security fixes will continue for 4.x until September 2026. You have plenty of time to consider an upgrade, and take advantage of newer (and faster!) PHP versions.  

Why should you upgrade? 

  We are going to use your role in the project to provide some good reasons: * If you are a developer   * More strict types, meaning better IDE support and more errors catched at development time.   * New features in CakePHP 5.x will make your code more readable, like Typed finder parameters https://book.cakephp.org/5/en/appendices/5-0-migration-guide.html#typed-finder-parameters      * Quality of life features, reducing development time like https://book.cakephp.org/5/en/appendices/5-0-migration-guide.html#plugin-installer   * Compatibility with PHP 8.3 for extra performance & support   * If you are a manager   * Ensure your development team is forced to drop old auth code and embrace the new authentication/authorization layer https://book.cakephp.org/5/en/appendices/5-0-migration-guide.html#auth   * The new authentication layer will allow you to easily integrate features like single sign on, two factor authentication or hardware keys (like Yubikeys), as there are plugins available handling all these features.   * Get an extended support window. CakePHP is one of the longest maintained frameworks out there, upgrading to CakePHP 5 will keep your core maintained past 2026.   * Upgrade to PHP 8.3 and force legacy vendors to be up to date with the new version, this will also push your team to get familiar with the new PHP core features.   * If you are an investor, not directly related with the project day-to-day operations   * Secure your inversion for a longer period.   * Reduce your exposure to security issues.   * Send a strong message to your partners, keeping your product updated with the latest technology trends.   * Send a strong message to your team, investing in the upgrade of your application will let them know the project is aiming for a long term future.   In conclusion, upgrading to CakePHP 5 is a good move for 2024 whether you're a developer, manager, or investor. The version 5 is stable and ready to go. Staying current becomes not just a best practice but a strategic advantage.   If you are in doubt, feel free to contact us. We'll review your case (for free) and provide an actionable recommendation based on your current situation in the next business day.  

A quick CakePHP Local environment with DDEV

In the realm of web development, a seamless local environment is the bedrock for efficient and stress-free coding. Enter DDEV, a powerful tool that simplifies the setup process and empowers developers to dive into their projects with ease. In this blog post, we'll embark on a journey to demystify the process of setting up a local development environment using DDEV. Whether you're a seasoned developer or just starting in the world of web development, optimizing your local environment can significantly enhance your workflow.

Pre Conditions :

Install Docker https://docs.docker.com/get-docker/ and install DDEV https://ddev.readthedocs.io/en/stable/

Step 1: Create a new CakePHP project skeleton 

composer create-project cakephp/app myproject A new folder "myproject" will be created with a CakePHP project skeleton inside. Go to this new directory and proceed with the following instructions.

Step 2: Initial ddev setup

Run ddev config
This will do the initial ddev setup, press enter for all questions.  Run ddev auth ssh
This will add ssh key authentication to the ddev-ssh-auth container

Step 3: Adjust the settings

Inside "myproject" a new .ddev folder will be created, open config.yaml  and adjust there: php version, database and the database url environment.  For PHP:
php_version: "8.1"

For the database: database: type: mysql version: "8.0" For the environment variable: web_environment: - DATABASE_URL=mysql://db:db@db/db

Step 4: Start ddev

ddev start  This will spin up the project.

Step 5: Open your application

ddev launch This will open your project in a browser.   Once you have the application up and running, some useful commands you could run are:
  • ddev composer to execure composer
  • ddev mysql to get into the database
  • ddev ssh takes you into the web container.
In this link https://ddev.readthedocs.io/en/latest/users/usage/cli/ you can see more useful commands.   Hope you enjoy playing with DDEV!


We Bake with CakePHP