CakeDC Blog

TIPS, INSIGHTS AND THE LATEST FROM THE EXPERTS BEHIND CAKEPHP

Build a Single Page Application Using CakePHP and InertiaJS

The Inertia Plugin allows a CakePHP application to integrate Vue 3 components in the front end, without the need to write a specific API for data transfer.

This is done  by adding a Middleware and view classes that facilitate the conversion of objects and data in JSON almost automatically, as well as the direct load in the components.

The plugin is thought of as a base to extend and use your app’s specific controllers and views from.

Just because  it works out of the box doesn't mean it is intended to be used exactly as is,  but this will  provide you a good kick start.

See the repo here: https://github.com/CakeDC/cakephp-inertia

Requirements

  • CakePHP 4.5

  • PHP >= 8.1

  • NodeJS 18.9 (only for build Vue Components, not required on running site)


Step 1: Create a basic CakePHP install


For this example I will use a basic installation using Docker and Composer. 

First you must create project from cakephp/app


$> composer create-project --prefer-dist cakephp/app:~4.5 inertia_app

$> cd inertia_app

$> cp config/app_local.example.php config/app_local.php


Then write an docker-compose.yml file as:

version: '3'

services:

  psql13:

    image: postgres:13

    container_name: inertia-app-postgres13

    volumes:

      - ./tmp/data/inertia-postgres13__db:/var/lib/postgresql:delegated

    environment:

      - POSTGRES_USER=my_app

      - POSTGRES_PASSWORD=secret

      - POSTGRES_DB=my_app

      - PGUSER=my_app

      - PGDATABASE=my_app

      - PGPASSWORD=secret

    ports:

      - '7432:5432'


  cakephp:

    image: webdevops/php-nginx:8.1

    container_name: inertia-app-cakephp

    working_dir: /application

    volumes:

      - ./:/application:cached

      - ~/.ssh:/home/application/.ssh:ro

    environment:

      - WEB_DOCUMENT_ROOT=/application/webroot

      - DATABASE_URL=postgres://my_app:secret@inertia-app-postgres13:5432/my_app

    ports:

      - "9099:80"


Launch the container and go to http://localhost:9099/


$> docker-compose up -d


Step 2: Add CakePHP Inertia plugin


Install plugin via command line:

$> composer require cakedc/cakephp-inertia


Once installed enable it in src/Application.php, adding at the bottom of bootstrap function:

$this->addPlugin('CakeDC/Inertia');


or by command line:

$> bin/cake plugin load CakeDC/Inertia


Step 3: Create Vue App and install it


To create Vue App type in command line:

$> bin/cake create_vue_app


This command create in the resources directory the files that use our App, also create in root directory the files:

  • webpack.mix.js

  • package.json


Then in root directory install with NPM:

$> npm install


Step 4: Create simple SPA (Single Page Application)


Create a single page called dashboard that show values sets in a controller action

We need to first add InertiaResponseTrait


use CakeDC\Inertia\Traits\InertiaResponseTrait;


class PagesController extends AppController

{


 use InertiaResponseTrait;


 ...

 ...


}


Create a new function that would look like this:

public function dashboard()

{

  //set default php layout of plugin that use vue

  $this->viewBuilder()->setTheme('CakeDC/Inertia');


  $page = [

      'text' => 'hello world 1',

      'other' => 'hello world 2',

  ];

  $this->set(compact('page'));

}


in config/routes.php uncomment lines to catch all routes:

$builder->connect('/{controller}', ['action' => 'index']);

$builder->connect('/{controller}/{action}/*', []);

and comment line:

$builder->connect('/pages/*', 'Pages::display');


Then create file resources/js/Components/Pages/Dashboard.vue that would look like this:

<script setup>

import Layout from '../Layout'

import { Head } from '@inertiajs/vue3'

import {onMounted} from "vue";


defineProps({

    csrfToken: String,

    flash: Array,

    page: Array,

})


onMounted(() => {

    console.log('Component Dashboard onMounted hook called')

})

</script>


<template>

    <Layout>

        <Head title="Welcome" />

        <h1>Welcome</h1>

        <p>{{page.text}}</p>

        <p>{{page.other}}</p>

    </Layout>

</template>


On root directory execute:

$> npm run dev


IMPORTANT: Whenever you modify the .vue templates, you must run this script.

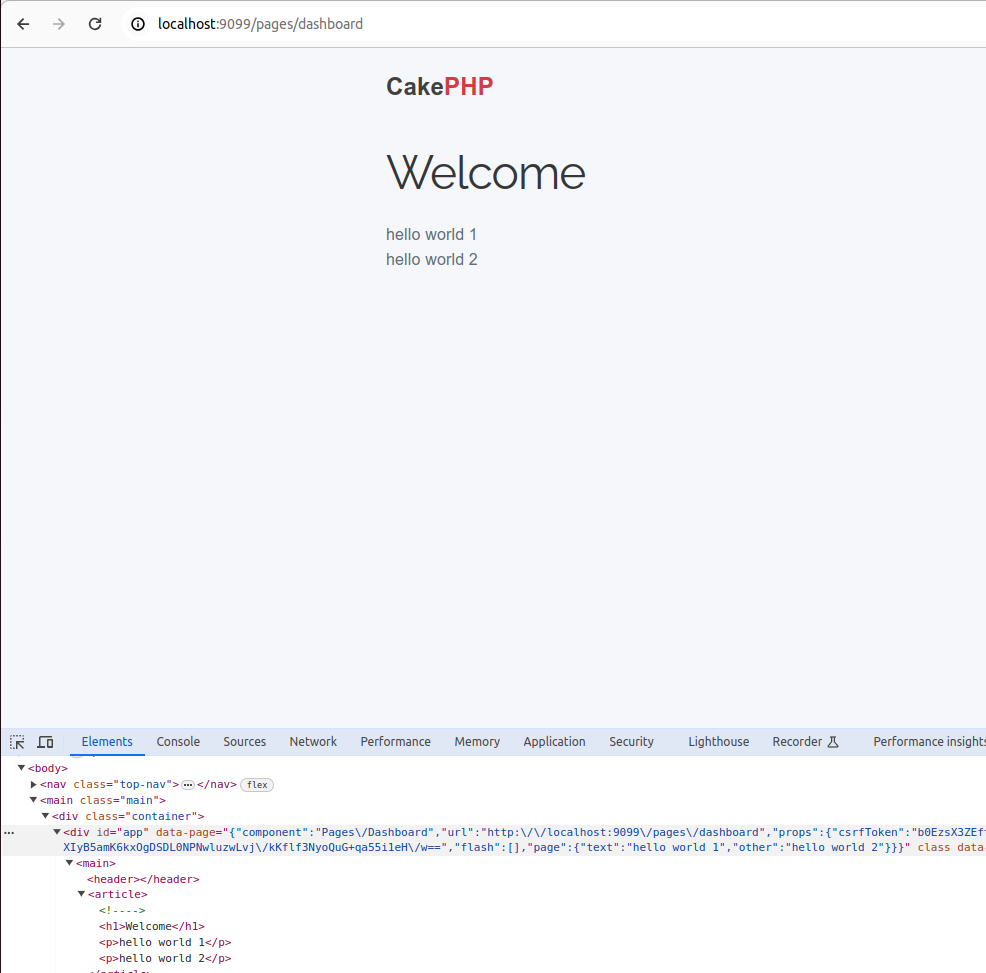
Go to http://localhost:9099/pages/dashboard to see that Dashboard Vue Component prints values assignments on Dashboard CakePHP function.


Step 5: Bake CRUD system


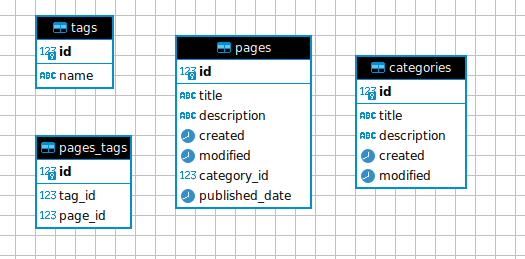
For this example, we use sql file on config/sql/example/postgresql.pgsql


That creates a database with the relations


Once the database has been created, bake models and controllers as normal using:

$> bin/cake bake model Pages --theme CakeDC/Inertia

$> bin/cake bake controller Pages --theme CakeDC/Inertia

$> bin/cake bake model Tags --theme CakeDC/Inertia

$> bin/cake bake controller Tags --theme CakeDC/Inertia

$> bin/cake bake model Categories --theme CakeDC/Inertia

$> bin/cake bake controller Categories --theme CakeDC/Inertia


and bake templates using vue_template instead of template as:

$> bin/cake bake vue_template Pages --theme CakeDC/Inertia

$> bin/cake bake vue_template Tags --theme CakeDC/Inertia

$> bin/cake bake vue_template Categories --theme CakeDC/Inertia


Again run:

$> npm run dev


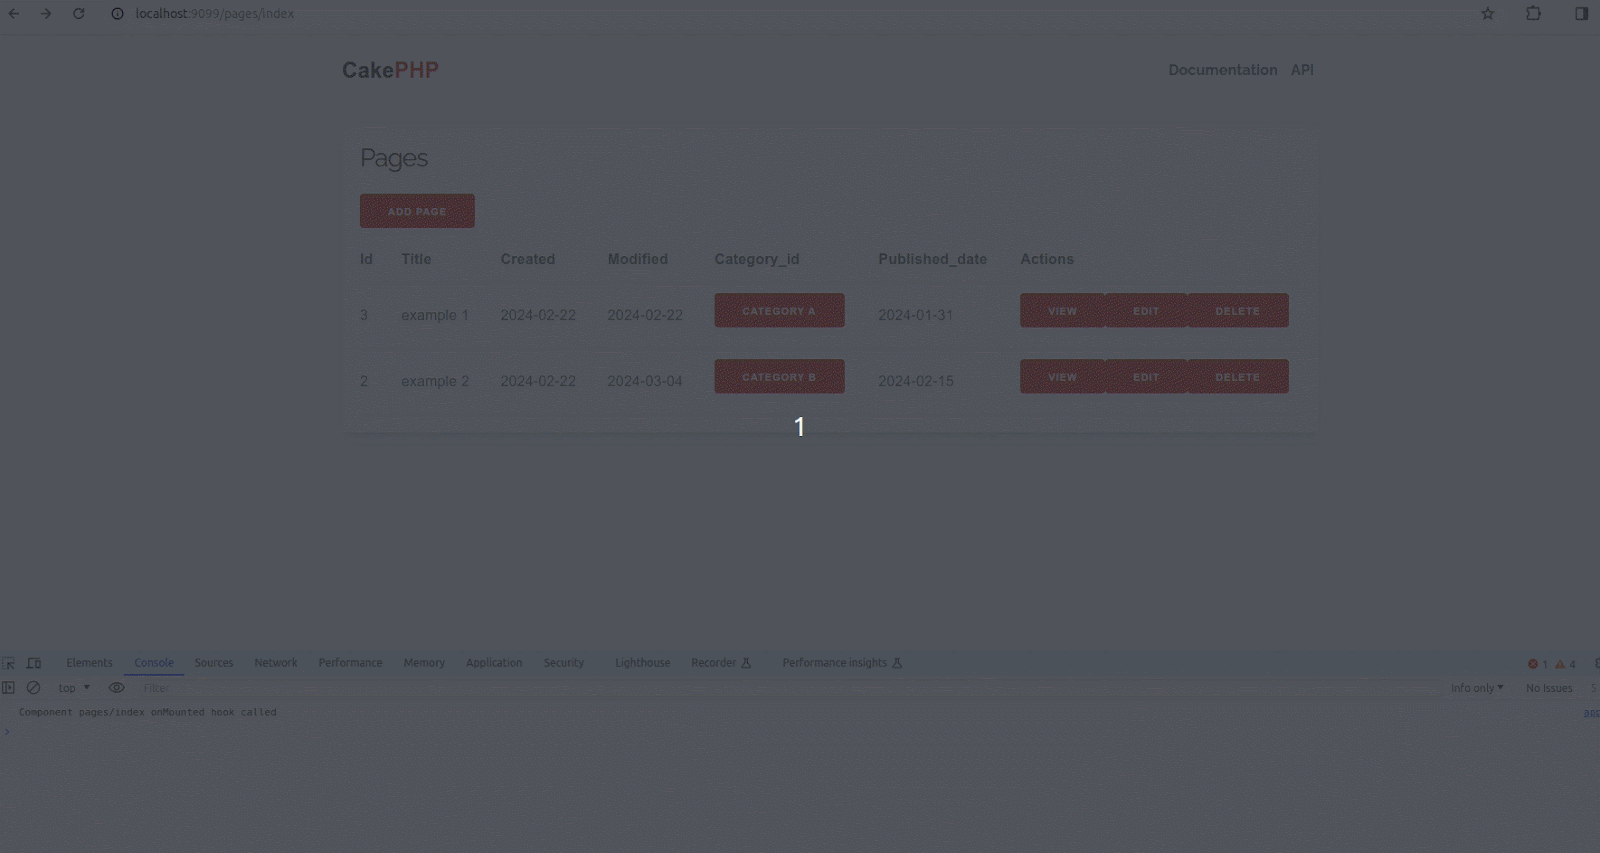
You can the results from this example by going to http://localhost:9099/pages/index


In the following recording you can see how to add, edit and delete a record without reloading the page at any time.


Step 6: Using prefix and adding a navigation menu


Add route to prefix Admin on config/routes.php

$builder->prefix('admin', function (RouteBuilder $builder) {

   $builder->fallbacks(DashedRoute::class);

});


To generate controllers and template with a prefix use --prefix option of bake command as:

$> bin/cake bake controller Pages --prefix Admin --theme CakeDC/Inertia

$> bin/cake bake controller Tags --prefix Admin --theme CakeDC/Inertia

$> bin/cake bake controller Categories --prefix Admin --theme CakeDC/Inertia

$> bin/cake bake vue_template Pages --prefix Admin --theme CakeDC/Inertia

$> bin/cake bake vue_template Tags --prefix Admin --theme CakeDC/Inertia

$> bin/cake bake vue_template Categories --prefix Admin --theme CakeDC/Inertia


You can add a horizontal menu to navigate through controllers


Edit resources/Components/Layout.vue and put inside header tag links as:

<header>

   <Link as="button" href="/pages/index" class="button shadow radius right small">Pages</Link>

   <Link as="button" href="/tags/index" class="button shadow radius right small">Tags</Link>

   <Link as="button" href="/categories/index" class="button shadow radius right small">Categories</Link>

</header>


Again run:

$> npm run dev


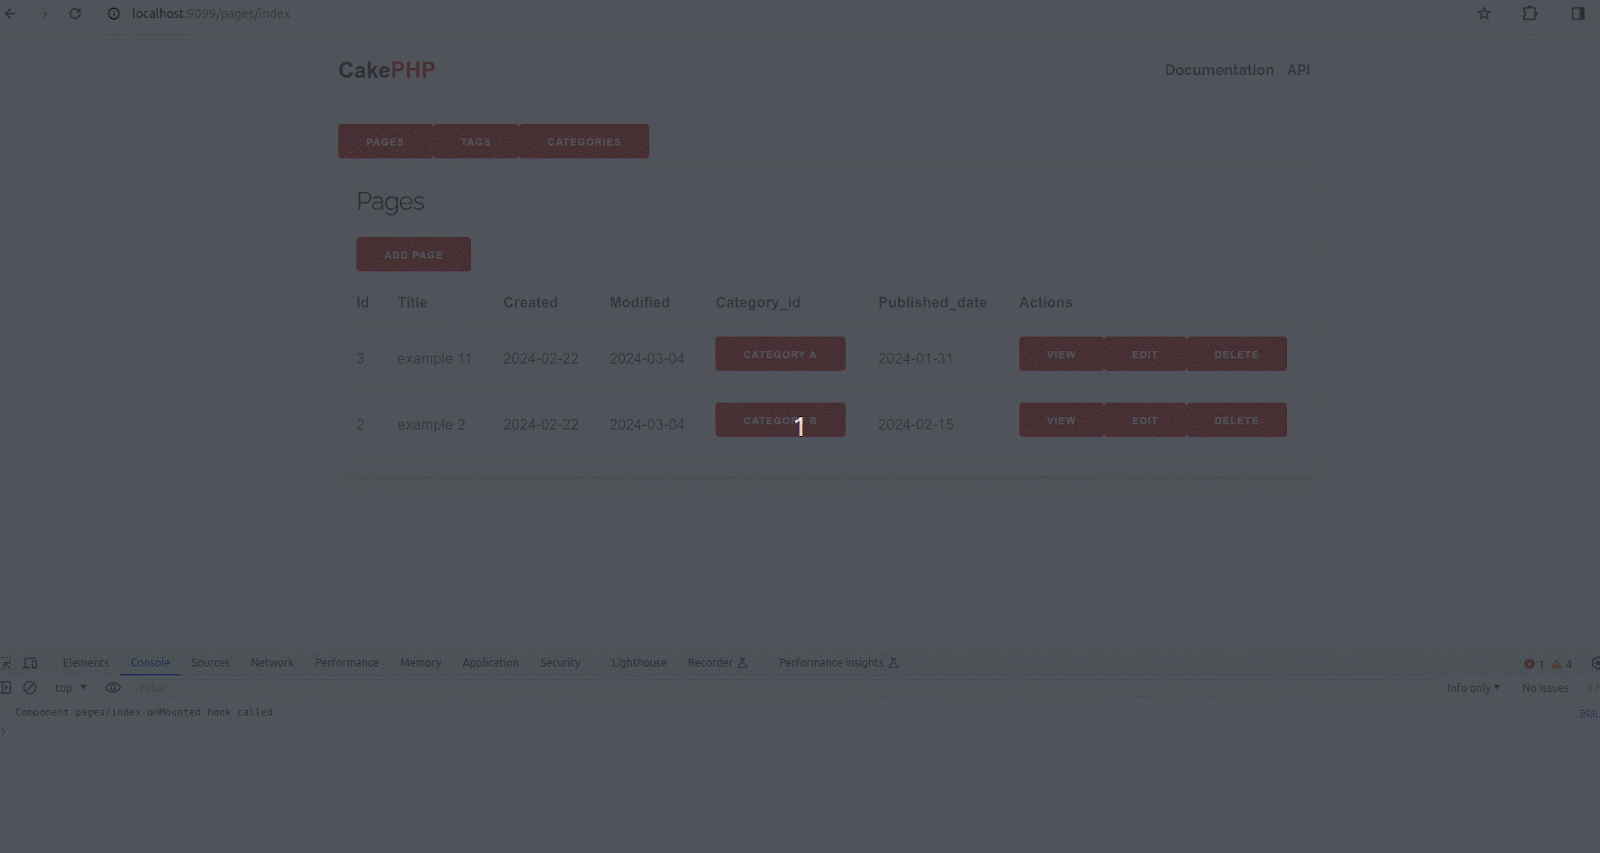
You can see the results from this  example by going to http://localhost:9099/admin/pages/index


In the following recording you can see how to add, edit and delete a record without reloading the page at any time and navigate through pages, tags and categories.


Hopefully this example will make your experience easier! Let us know: [email protected].

Latest articles

The Generational Perception of Work and Productivity in the Remote-Work Era

Generational Work Illustration

The Generational Perception of Work and Productivity in the Remote-Work Era

In the year 2020, everything changed when the world stopped completely during COVID-19. The perception of safety, health, mental health, work, and private life completely turned around and led to a different conception of the world we knew. As the global pandemic thrived, we saw how many jobs could be done from home, because people had to reinvent themselves as we were not able to go to our workplaces. And it settled a statement, changing the perception of work dramatically. Before it, and for older generations, work was associated with physical presence, rigid schedules, and productivity measured by visible hours. But after it, younger generations saw the potential of working from home or being a so-called digital nomad, giving more priority to flexibility, emotional well-being, and measuring efficiency through results. This change reflects a social evolution guided by new technologies, new expectations, and a more connected workforce. Remote work has been key in this transformation. For thousands of professionals, the ability to work from home meant reclaiming personal time, reducing stress, and achieving a healthier work--life balance (for example, by reducing commuting time most people get almost 2 extra hours of personal time). Productivity did not decrease --- in many cases, it actually improved --- because the focus shifted from "time spent" to "goals achieved." This model has also shown that trust and autonomy can lead to more engaged teams. However, despite all of the perks, many companies are apparently eager to return to traditional workplaces. Maybe it is the fear of losing control or a lack of understanding of the new work dynamics, but this tendency threatens to undo meaningful progress for generations that have already experienced the freedom and effectiveness of remote work. Going back to the old-fashioned way of work feels like a step backward. So now, the challenge is to find a middle ground that acknowledges the cultural and technological changes of our time, passing the torch to a new generation of workers. Because productivity is no longer measured by how many people are sitting in a chair, but by the value of the final results. And if we want organizations truly prepared for the future, we must listen to younger generations and build work models that prioritize both results and workers' well-being. In CakeDC we do believe in remote work! Proving through the years that work can be done remotely no matter the timezone or language.

CakePHP E2E Testing with Cypress

End-to-End Testing CakePHP Applications with Cypress

End-to-end (E2E) testing has increasingly become a critical part of modern web development workflows. Unit and integration tests are vital, but only End-to-End (E2E) testing accurately verifies the complete user flow, from the browser interface down to the database. For robust applications built with CakePHP 5, E2E tests provide the ultimate safety net. In this article, we explore how to introduce Cypress, a popular JavaScript-based E2E testing framework, into a CakePHP 5 project. Our goal is to deliver a practical, standards-oriented approach that keeps your application maintainable, predictable, and testable at scale.

1. Why Cypress for CakePHP?

E2E testing has historically been considered slow, brittle, and difficult to maintain. Tools like Selenium or PhantomJS brought automation, but at the cost of complex setup, inconsistent execution, and poor debugging capabilities. Cypress solves many of these challenges:
  • Runs inside the browser, providing native access to DOM events
  • Offers time-travel debugging for better visibility
  • Ships with a stable execution model — no explicit waits, fewer flaky tests
  • Integrates easily with JavaScript-enabled CakePHP frontends (HTMX, Vue, React, Stimulus, etc.)
  • Provides first-class tools for network mocking, API testing, and fixtures
For CakePHP applications transitioning toward more dynamic, interactive user interfaces, Cypress becomes an essential part of the test strategy.

2. Setting up the Environment: CakePHP 5 & Cypress

Ensure you have a functioning CakePHP 5 application and Cypress installed as a development dependency: npm init -y npm install cypress --save-dev Open Cypress: npx cypress open Folder structure: cypress/ e2e/ fixtures/ support/

2.0. Understanding the Cypress Directory Structure

Running npx cypress open creates the cypress/ folder in the root of your CakePHP project. Understanding its purpose is key to organizing your tests:
Directory Purpose Relevance to CakePHP E2E
cypress/e2e Main tests. Stores all your primary test files (e.g., cart_flow.cy.js). This is where you test your CakePHP routes and UI.
cypress/fixtures Static data such as JSON files for mocking API responses. Useful for mocking external services or complex input data.
cypress/support Reusable code, custom commands, environment config, and global hooks. Crucial for defining the cy.login command using cy.session.
cypress.config.js Main Cypress configuration file. Necessary to integrate Cypress with CakePHP server and DB tasks.

2.1. The Critical E2E Test Selector: data-cy

In E2E testing, relying on standard CSS selectors like id or class is a fragile practice. Designers or frontend developers frequently change these attributes for styling or layout, which immediately breaks your tests. The best practice is to introduce a dedicated test attribute, such as data-cy. This attribute serves one purpose: E2E testing. It makes your tests resilient to UI changes. Example in a CakePHP template (.php): <button type="submit" class="btn btn-primary" data-cy="add-to-cart-button"> Add to Cart </button> Using the selector in Cypress: cy.get('[data-cy="add-to-cart-button"]').click();

3. E2E Test Case: The Shopping Cart Flow

This section details the construction of our critical E2E test, focusing on the end-user experience: Authentication, Product Addition, and Cart Verification. To ensure test reliability, we prioritize maintaining a clean and known state before execution.

3.1. Resetting the Database (beforeEach)

We must ensure a clean state for every test. Use Cypress tasks to call a CakePHP shell command that drops, migrates, and seeds your dedicated test database. // In cypress.config.js setupNodeEvents on('task', { resetDb() { console.log('Test database reset completed.'); return null; } }); // In the test file beforeEach(() => { cy.task('resetDb'); });

3.2. Shopping Cart Test (cypress/e2e/cart_flow.cy.js)

This test verifies the successful user journey from browsing to checkout initiation, using the resilient data-cy attributes. The beforeEach hook ensures that for every test, the database is reset and a user is quickly logged in via session caching. The it() Block: Core Actions and Assertions
  • Product Selection: Navigate to a specific product page. cy.visit('/products/view/1');
  • Add to Cart Action: Locate the "Add to Cart" button using data-cy and click it. cy.get('[data-cy="add-to-cart-button"]').click();
  • Confirmation Check: Assert that a visible confirmation message appears. cy.get('[data-cy="notification-message"]').should('contain', 'Product added to cart!');
  • Cart Navigation: Navigate to the cart summary page. cy.visit('/cart');
  • Content Verification (Assertions): Verify the presence of the product and the correct total price. cy.get('[data-cy="cart-item-name-1"]').should('contain', 'Product A'); cy.get('[data-cy="cart-total-price"]').should('contain', '100.00');
  • Checkout Initiation: Click the link to proceed. cy.get('[data-cy="checkout-link"]').should('be.visible').click();
  • Final Navigation Check: Assert that the URL has successfully changed to the checkout route. cy.url().should('include', '/checkout');
Test Code (cypress/e2e/cart_flow.cy.js): /// cypress/e2e/cart_flow.cy.js describe('E-commerce Shopping Cart Flow', () => { beforeEach(() => { cy.task('resetDb'); cy.login('[email protected]', 'secure-password'); }); it('Should successfully add an item to the cart and verify the total price', () => { cy.visit('/products/view/1'); cy.get('[data-cy="add-to-cart-button"]').click(); cy.get('[data-cy="notification-message"]').should('contain', 'Product added to cart!'); cy.visit('/cart'); cy.get('[data-cy="cart-item-name-1"]').should('contain', 'Product A'); cy.get('[data-cy="cart-total-price"]').should('contain', '100.00'); cy.get('[data-cy="checkout-link"]').should('be.visible').click(); cy.url().should('include', '/checkout'); }); });

4. Advanced Good Practices: Optimizing Cypress and E2E Testing

While functional E2E tests are essential, achieving a high-quality, maintainable, and fast test suite requires adopting several advanced practices.

4.1. Fast Authentication with cy.session

A standard E2E test logs in by interacting with the UI (cy.type, cy.click). While accurate, repeating this for every test is slow and inefficient. For subsequent tests in the same flow, we should skip the UI login using Cypress's cy.session. The cy.session command caches the browser session (cookies, local storage, etc.) after the first successful login. For every test that follows, Cypress restores the session state, avoiding the slow UI login process and drastically reducing execution time. Implementing the Custom cy.login Command (in cypress/support/commands.js): Cypress.Commands.add('login', (email, password) => { // 1. Define the session identifier (e.g., the user's email) const sessionName = email; // 2. Use cy.session to cache the login process cy.session(sessionName, () => { // This function only runs the first time the sessionName is encountered cy.visit('/users/login'); cy.get('[data-cy="login-email-input"]').type(email); cy.get('[data-cy="login-password-input"]').type(password); cy.get('[data-cy="login-submit-button"]').click(); // Assert that the login was successful and the session is ready cy.url().should('not.include', '/users/login'); }); // After the session is restored/created, navigate to the base URL cy.visit('/'); });

4.2. Essential Good Practices for Robust E2E Tests

Here is a list of best practices to ensure your CakePHP 5 E2E tests remain fast, stable, and easy to maintain:
  • Prioritize data-cy Selectors: As discussed, never rely on dynamic attributes like generated IDs, CSS classes (which are prone to styling changes), or nth-child selectors. Use the dedicated data-cy attribute for guaranteed stability.
  • Use Custom Commands for Repetitive Actions: Beyond login, create custom commands (e.g., cy.addItemToCart(itemId)) for any sequence of user actions repeated across multiple tests. This improves readability and reusability.
  • Avoid UI Waiting: Do not use hard-coded waiting times like cy.wait(5000). Cypress is designed to wait automatically for elements to exist and become actionable. If you need to wait for an API call, use cy.intercept() to stub or monitor network requests and then wait specifically for that request to complete (cy.wait('@api-call')).
  • Limit Scope (Test What You Own): E2E tests should focus on your application's logic, not external services (like third-party payment gateways). Use cy.stub() or cy.intercept() to mock these external interactions. If you can test a function at the unit or integration level, avoid duplicating that logic in the slower E2E layer.
  • Test Isolation is Non-Negotiable: Always use the database reset task (cy.task('resetDb')) in a beforeEach hook. Never let one test affect the state of another.
  • Break Down Large Tests: Keep individual it() blocks focused on a single logical assertion or small user journey (e.g., "Add a single item," not "Add item, change quantity, apply coupon, and checkout"). This makes debugging failure points much faster.

5. Conclusion

By combining the architectural strength of CakePHP 5 with the efficiency of Cypress, you build a highly reliable testing pipeline. Utilizing data-cy ensures your tests are stable against UI changes, and leveraging cy.session drastically reduces execution time, making E2E testing a fast and sustainable practice for your development team.

Scaling Task Processing in CakePHP: Achieving Concurrency with Multiple...

This article is part of the CakeDC Advent Calendar 2025 (December 9th 2025)

Introduction: need of Concurrency

While offloading long-running tasks to an asynchronous queue solves the initial web request bottleneck, relying on a single queue worker introduces a new, serious point of failure and bottleneck. This single-threaded approach transfers the issue from the web server to the queue system itself.

Bottlenecks of Single-Worker Queue Processing

The fundamental limitation in the standard web request lifecycle is its synchronous, single-threaded architecture. This design mandates that a user's request must wait for all associated processing to fully complete before a response can be returned. The Problem: Single-Lane Processing Imagine a queue worker as a single cashier at a very busy bank . Each item in the queue (the "job") represents a customer.
  1. Job Blocking (The Long Transaction): If the single cashier encounters a customer with an extremely long or slow transaction (e.g., generating a massive report, bulk sending 100,000 emails, or waiting for a slow API), every other customer must wait for that transaction to complete.
  2. Queue Backlog Accumulation: New incoming jobs (customers) pile up rapidly in the queue. This is known as a queue backlog. The time between a job being put on the queue and it starting to execute (Job Latency) skyrockets.
  3. Real-Time Failure: If a job requires an action to happen now (like sending a password reset email), the backlog means that action is critically delayed, potentially breaking the user experience or application logic.
  4. Worker Vulnerability and Downtime: If this single worker crashes (due to a memory limit or unhandled error) or is temporarily taken offline for maintenance, queue processing stops entirely. The application suddenly loses its entire asynchronous capability until the worker is manually restarted, resulting in a complete system freeze of all background operations.
To eliminate this bottleneck, queue consumption must be handled by multiple concurrent workers, allowing the system to process many jobs simultaneously and ensuring no single slow job can paralyze the entire queue.

Improved System Throughput and Reliability with Multiple Workers

While introducing a queue solves the initial issue of synchronous blocking, scaling the queue consumption with multiple concurrent workers is what unlocks significant performance gains and reliability for the application's background processes.

Key Benefits of Multi-Worker Queue Consumption

  • Consistent, Low Latency: Multiple workers process jobs in parallel, preventing any single slow or heavy job (e.g., report generation) from causing a queue backlog. This ensures time-sensitive tasks, like password resets, are processed quickly, maintaining instant user feedback.
  • Enhanced Reliability and Resilience: If one worker crashes, the other workers instantly take over** the remaining jobs. This prevents a complete system freeze and ensures queue processing remains continuous.
  • Decoupling and Effortless Scaling: The queue facilitates decoupling. When background load increases, you simply deploy more CakePHP queue workers. This horizontal scaling is simple, cost-effective, and far more efficient than scaling the entire web server layer.

Workflows that Benefit from Multi-Worker Concurrency

These examples show why using multiple concurrent workers with the CakePHP Queue plugin (https://github.com/cakephp/queue) is essential for performance and reliability:
  • Mass Email Campaigns (Throughput): Workers process thousands of emails simultaneously, drastically cutting the time for large campaigns and ensuring the entire list is delivered fast.
  • Large Media Processing (Parallelism): Multiple workers handle concurrent user uploads or divide up thumbnail generation tasks. This speeds up content delivery by preventing one heavy image from blocking all others.
  • High-Volume API Synchronization (Consistency): Workers ensure that unpredictable external API latency from one service doesn't paralyze updates to another. This maintains a consistent, uninterrupted flow of data across all integrations.

The Job

Lets say that you have the queue job like this: <?php declare(strict_types=1); namespace App\Job; use Cake\Mailer\Mailer; use Cake\ORM\TableRegistry; use Cake\Queue\Job\JobInterface; use Cake\Queue\Job\Message; use Interop\Queue\Processor; /** * SendBatchNotification job */ class SendBatchNotificationJob implements JobInterface { /** * The maximum number of times the job may be attempted. * * @var int|null */ public static $maxAttempts = 10; /** * We need to set the shouldBeUnique to true to avoid race condition with multiple queue workers * * @var bool */ public static $shouldBeUnique = true; /** * Executes logic for SendBatchNotificationJob * * @param \Cake\Queue\Job\Message $message job message * @return string|null */ public function execute(Message $message): ?string { // 1. Retrieve job data from the message object $data = $message->getArgument('data'); $userId = $data['user_id'] ?? null; if (!$userId) { // Log error or skip, but return ACK to remove from queue return Processor::ACK; } try { // 2. Load user and prepare email $usersTable = TableRegistry::getTableLocator()->get('Users'); $user = $usersTable->get($userId); $mailer = new Mailer('default'); $mailer ->setTo($user->email) ->setSubject('Your batch update is complete!') ->setBodyString("Hello {$user->username}, \n\nThe recent batch process for your account has finished."); // 3. Send the email (I/O operation that can benefit from concurrency) $mailer->send(); } catch (\Exception $e) { // If the email server fails, we can tell the worker to try again later // The queue system will handle the delay and retry count. return Processor::REQUEUE; } // Success: Acknowledge the job to remove it from the queue return Processor::ACK; } } Setting $shouldBeUnique = true; in a CakePHP Queue Job class is crucial for preventing a race condition when multiple queue workers consume the same queue, as it ensures only one instance of the job is processed at any given time, thus avoiding duplicate execution or conflicting updates. In another part of the application you have code that enqueues the job like this: // In a Controller, Command, or Service Layer: use Cake\ORM\TableRegistry; use Cake\Queue\QueueManager; use App\Job\SendBatchNotificationJob; // Our new Job class // Find all users who need notification (e.g., 500 users) $usersToNotify = TableRegistry::getTableLocator()->get('Users')->find()->where(['is_notified' => false]); foreach ($usersToNotify as $user) { // Each loop iteration dispatches a distinct, lightweight job $data = [ 'user_id' => $user->id, ]; // Dispatch the job using the JobInterface class name QueueManager::push(SendBatchNotificationJob::class, $data); } // Result: 500 jobs are ready in the queue. By pushing 500 separate jobs, you allow 10, 20, or even 50 concurrent workers to pick up these small jobs and run the email sending logic in parallel, drastically reducing the total time it takes for all 500 users to receive their notification.

Implementing Concurrency with multiple queue workers

In modern Linux distributions, systemd is the preferred init and service manager. By leveraging User Sessions and the Lingering feature, we can run the CakePHP worker as a dedicated, managed service without needing root privileges for the process itself, offering excellent stability and integration.

SystemD User Sessions

Prerequisite: The Lingering User Session

For a service to run continuously in the background, even after the user logs out, we must enable the lingering feature for the user account that will run the workers (e.g., a service user named appuser). Enabling Lingering: Bash sudo loginctl enable-linger appuser This ensures the appuser's systemd user session remains active indefinitely, allowing the worker processes to survive server reboots and user logouts.

Creating the Systemd User Unit File

We define the worker service using a unit file, placed in the user's systemd configuration directory (~/.config/systemd/user/).
  • File Location: ~appuser/.config/systemd/user/[email protected]
  • Purpose of @: The @ symbol makes this a template unit. This allows us to use a single file to create multiple, distinct worker processes, which is key to achieving concurrency.
[email protected] Content: Ini, TOML [Unit] Description=CakePHP Queue Worker #%i After=network.target [Service] # We use the full path to the PHP executable ExecStart=/usr/bin/php /path/to/your/app/bin/cake queue worker # Set the current working directory to the application root WorkingDirectory=/path/to/your/app # Restart the worker if it fails (crashes, memory limit exceeded, etc.) Restart=always # Wait a few seconds before attempting a restart RestartSec=5 # Output logs to the systemd journal StandardOutput=journal StandardError=journal # Ensure permissions are correct and process runs as the user User=appuser [Install] WantedBy=default.target

Achieving Concurrency (Scaling the Workers)

Concurrency is achieved by enabling multiple instances of this service template, distinguished by the suffix provided in the instance name (e.g., -1, -2, -3). Reload and Start Instances: After creating the file, the user session must be reloaded, and the worker instances must be started and enabled: Reload Daemon (as appuser): Bash systemctl --user daemon-reload Start and Enable Concurrent Workers (as appuser): To run three workers concurrently: Bash # Start Worker Instance 1 systemctl --user enable --now [email protected] # Start Worker Instance 2 systemctl --user enable --now [email protected] # Start Worker Instance 3 systemctl --user enable --now [email protected] Result: The system now has three independent and managed processes running the bin/cake queue worker command, achieving a concurrent processing pool of three jobs.

Monitoring and Management

systemd provides powerful tools for managing and debugging the worker pool: Check Concurrency Status: Bash systemctl --user status 'cakephp-worker@*' This command displays the status of all concurrent worker instances, showing which are running or if any have failed and been automatically restarted. Viewing Worker Logs: All output is directed to the systemd journal: Bash journalctl --user -u 'cakephp-worker@*' -f This allows developers to inspect errors and task completion messages across all concurrent workers from a single, centralized log. Using systemd and lingering is highly advantageous as it eliminates the need for a third-party tool, integrates naturally with system logging, and provides reliable process management for a robust, concurrent task environment.

Summary

Shifting from a single worker to multiple concurrent workers is essential to prevent bottlenecks and system freezes caused by slow jobs, ensuring high reliability and low latency for asynchronous tasks. One robust way to achieve this concurrency in CakePHP applications is by using Systemd User Sessions and template unit files (e.g., [email protected]) to easily manage and horizontally scale the worker processes. This article is part of the CakeDC Advent Calendar 2025 (December 9th 2025)

We Bake with CakePHP