CakeDC Blog

TIPS, INSIGHTS AND THE LATEST FROM THE EXPERTS BEHIND CAKEPHP

Users plugin 9.x for CakePHP4

CakePHP 4 is out for some time (4.0.2 at the time of writing this post) and some of you already asked "Is there a cakedc/users version for cake4?" a couple times...

The answer is YES!.

We had a meeting after we realized AuthComponent was going to be deprecated, the authentication/authorization layer was leaning towards
Middlewares and getting a new Plugin home ourside of the core.
We decided to embrace the new middlewares and provide native compatibility from version 9.x of the plugin.

Before we explain how is it going to work, and proceed to setup a project from scratch a couple answers to potential questions:

* Are you going to maintain cakedc/users 8.x for CakePHP 3.x?
  * Yes, as long as you use it, we'll keep it maintained. Version 8.x will be a LTS version. We'll consider backporting some features from 9.x but the
  main objective of 8.x is to provide stability over time to existing CakePHP 3 projects.
* I'm planning to migrate my project from CakePHP 3 to CakePHP 4, what's the migration path for cakedc/users?
  * Keep the version 8.x of the plugin for some time. Complete your upgrade and then decide if you want to migrate to cakedc/users 9.x.
  We wrote a migration guide here when you decide it's time to move forward.
* AuthComponent is going to explode in CakePHP 4.x ?
  * No, it's deprecated, but deprecated also means it's completely functional. Just keep it until you decide to upgrade it.
 
This blog post is the first of a series of articles about cakedc/users 9.x where we'll explain how to use the plugin from scratch, it's benefits and
also the way the new authentication & authorization layers work for a CakePHP 4.x application.

We've kept our main objectives for this plugin: provide a quick, easy, flexible users management plugin to help you build awesome products on top of CakePHP 4.

So let's create a new project

* Ensure you have a working develop environment, download a development vagrant machine or pick some other's environment.

composer create-project cakephp/app:^4 users9

Now we have a new CakePHP 4 project skeleton created under folder users9.
Test it using bin/cake server then go to http://localhost:8765 and check it's all green.


all green checks for cakephp 4


* Install the plugin using
composer require cakedc/users:^9

* Now configure your application to use the plugin in your src/Application.php bootstrap() method, add
$this->addPlugin(\CakeDC\Users\Plugin::class);

* Create the required tables in your configured Datasource using Migrations:
bin/cake migrations migrate -p CakeDC/Users

This will create an empty `users` table and `social_accounts` to hold your authenticatio data.

* Now create a superadmin user
bin/cake users addSuperuser

It will create a superadmin user and a random password, copy the user and password to a safe place.

Now start the standalone server using bin/cake server again, and go to the home page http://localhost:8765... you'll see the login form.


login form cakephp 4 and cakedc/users


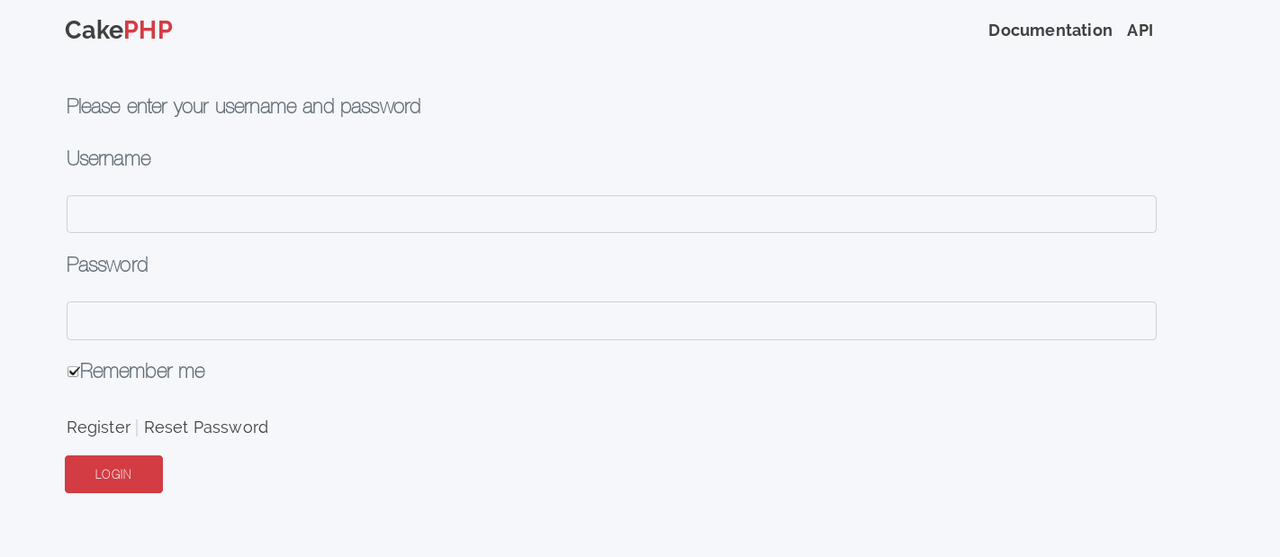
If you use the superadmin credentials previously generated, you'll be able to login and continue to the home page.

Total setup process, possibly less than 5 minutes if your network allows it...

How is it actually working?

* Once the plugin is added to you Application class through the Plugin class, we implement the  `AuthenticationService` and `AuthorizationService` provider interfaces, and use
the `middleware()` plugin callback to inject the configured middlewares into the Application middleware queue, see the `MiddlewareQueueLoader`.
We do it to keep the loading and configuration of the middlewares in one place, and decide the middlewares needed based on your configuration, for example if you are using
social login with Facebook, we configure which middlewares you need loaded and the correct order.
Check LINK for customization options of the plugin. We'll deal with customization in other articles of this series.

* CakePHP core Authentication and Authorization middlewares are also loaded, with the provided configuration. Check file vendor/cakedc/users/config/users.php for the
default configuratio used. You'll see there we're using by default Session, Form, Token, Cookie and Social. Depending on your configuration we'll check if you're authenticated in the following order:
  * Your identity already in the session
  * You've posted login form and your credentials are in the request data
  * There is a token present we can retrieve, usually for API stateless token based auth
  * There is a remember me cookie present
  * Your identity is available after social login, and we can use it to login into the app
 
If all these methods fail, you're redirected to the login page, `/login` by default (configurable, of course).  

* But that's the first step, once we can identify who are you, the next step (Authorization) is to determine if you're allowed to access the page you're trying to open. The plugin default configuration has 2
Authorization methods, superuser and rbac.
  * If you're user is a superuser, you are granted
  * If there is a rule in the rbac configuration to match your role and the current page, you are granted
 
If none of the above, you are not authorized, and redirected to the home page.

One of the important concepts about the new authentication layer in CakePHP is: "Authentication happens before you hit AppController".
So when you get to your Controller, CakePHP alreay knows you're an existing user and you have permission to access the page. All the abstraction and complexity
of maintaining the authentication is now extracted and managed OUTSIDE of your controllers, reducing their complexity.

Give it a try in your next project! Let us know how it goes and share you experiences with us, we'll be happy to help in the community channels.


Latest articles

Build a Single Page Application Using CakePHP and InertiaJS

Build a Single Page Application using CakePHP and InertiaJS

  The Inertia Plugin allows a CakePHP application to integrate Vue 3 components in the front end, without the need to write a specific API for data transfer. This is done  by adding a Middleware and view classes that facilitate the conversion of objects and data in JSON almost automatically, as well as the direct load in the components. The plugin is thought of as a base to extend and use your app’s specific controllers and views from. Just because  it works out of the box doesn't mean it is intended to be used exactly as is,  but this will  provide you a good kick start. See the repo here: https://github.com/CakeDC/cakephp-inertia

Requirements

  • CakePHP 4.5
  • PHP >= 8.1
  • NodeJS 18.9 (only for build Vue Components, not required on running site)


Step 1: Create a basic CakePHP install

  For this example I will use a basic installation using Docker and Composer.  First you must create project from cakephp/app  
$> composer create-project --prefer-dist cakephp/app:~4.5 inertia_app $> cd inertia_app $> cp config/app_local.example.php config/app_local.php
  Then write an docker-compose.yml file as:
version: '3' services:   psql13:     image: postgres:13     container_name: inertia-app-postgres13     volumes:       - ./tmp/data/inertia-postgres13__db:/var/lib/postgresql:delegated     environment:       - POSTGRES_USER=my_app       - POSTGRES_PASSWORD=secret       - POSTGRES_DB=my_app       - PGUSER=my_app       - PGDATABASE=my_app       - PGPASSWORD=secret     ports:       - '7432:5432'     cakephp:     image: webdevops/php-nginx:8.1     container_name: inertia-app-cakephp     working_dir: /application     volumes:       - ./:/application:cached       - ~/.ssh:/home/application/.ssh:ro     environment:       - WEB_DOCUMENT_ROOT=/application/webroot       - DATABASE_URL=postgres://my_app:secret@inertia-app-postgres13:5432/my_app     ports:       - "9099:80"
  Launch the container and go to http://localhost:9099/  
$> docker-compose up -d
 

Step 2: Add CakePHP Inertia plugin

  Install plugin via command line:
$> composer require cakedc/cakephp-inertia
  Once installed enable it in src/Application.php, adding at the bottom of bootstrap function:
$this->addPlugin('CakeDC/Inertia');
  or by command line:
$> bin/cake plugin load CakeDC/Inertia


Step 3: Create Vue App and install it

  To create Vue App type in command line:
$> bin/cake create_vue_app
  This command create in the resources directory the files that use our App, also create in root directory the files:
  • webpack.mix.js
  • package.json
  Then in root directory install with NPM:
$> npm install


Step 4: Create simple SPA (Single Page Application)

  Create a single page called dashboard that show values sets in a controller action We need to first add InertiaResponseTrait  
use CakeDC\Inertia\Traits\InertiaResponseTrait;   class PagesController extends AppController {    use InertiaResponseTrait;    ...  ...   }
  Create a new function that would look like this:
public function dashboard() {   //set default php layout of plugin that use vue   $this->viewBuilder()->setTheme('CakeDC/Inertia');     $page = [       'text' => 'hello world 1',       'other' => 'hello world 2',   ];   $this->set(compact('page')); }
  in config/routes.php uncomment lines to catch all routes:
$builder->connect('/{controller}', ['action' => 'index']); $builder->connect('/{controller}/{action}/*', []);
and comment line:
$builder->connect('/pages/*', 'Pages::display');
  Then create file resources/js/Components/Pages/Dashboard.vue that would look like this:
<script setup> import Layout from '../Layout' import { Head } from '@inertiajs/vue3' import {onMounted} from "vue";   defineProps({     csrfToken: String,     flash: Array,     page: Array, })     onMounted(() => {     console.log('Component Dashboard onMounted hook called') }) </script>   <template>     <Layout>         <Head title="Welcome" />         <h1>Welcome</h1>         <p>{{page.text}}</p>         <p>{{page.other}}</p>     </Layout> </template>
  On root directory execute:
$> npm run dev
  IMPORTANT: Whenever you modify the .vue templates, you must run this script. Go to http://localhost:9099/pages/dashboard to see that Dashboard Vue Component prints values assignments on Dashboard CakePHP function.


Step 5: Bake CRUD system

  For this example, we use sql file on config/sql/example/postgresql.pgsql   That creates a database with the relations     Once the database has been created, bake models and controllers as normal using:
$> bin/cake bake model Pages --theme CakeDC/Inertia $> bin/cake bake controller Pages --theme CakeDC/Inertia $> bin/cake bake model Tags --theme CakeDC/Inertia $> bin/cake bake controller Tags --theme CakeDC/Inertia $> bin/cake bake model Categories --theme CakeDC/Inertia $> bin/cake bake controller Categories --theme CakeDC/Inertia
  and bake templates using vue_template instead of template as:
$> bin/cake bake vue_template Pages --theme CakeDC/Inertia $> bin/cake bake vue_template Tags --theme CakeDC/Inertia $> bin/cake bake vue_template Categories --theme CakeDC/Inertia
  Again run:
$> npm run dev
  You can the results from this example by going to http://localhost:9099/pages/index   In the following recording you can see how to add, edit and delete a record without reloading the page at any time.


Step 6: Using prefix and adding a navigation menu

  Add route to prefix Admin on config/routes.php
$builder->prefix('admin', function (RouteBuilder $builder) {    $builder->fallbacks(DashedRoute::class); });
  To generate controllers and template with a prefix use --prefix option of bake command as:
$> bin/cake bake controller Pages --prefix Admin --theme CakeDC/Inertia $> bin/cake bake controller Tags --prefix Admin --theme CakeDC/Inertia $> bin/cake bake controller Categories --prefix Admin --theme CakeDC/Inertia $> bin/cake bake vue_template Pages --prefix Admin --theme CakeDC/Inertia $> bin/cake bake vue_template Tags --prefix Admin --theme CakeDC/Inertia $> bin/cake bake vue_template Categories --prefix Admin --theme CakeDC/Inertia
  You can add a horizontal menu to navigate through controllers   Edit resources/Components/Layout.vue and put inside header tag links as:
<header>    <Link as="button" href="/pages/index" class="button shadow radius right small">Pages</Link>    <Link as="button" href="/tags/index" class="button shadow radius right small">Tags</Link>    <Link as="button" href="/categories/index" class="button shadow radius right small">Categories</Link> </header>
  Again run:
$> npm run dev
  You can see the results from this  example by going to http://localhost:9099/admin/pages/index   In the following recording you can see how to add, edit and delete a record without reloading the page at any time and navigate through pages, tags and categories.

  Hopefully this example will make your experience easier! Let us know: [email protected].

When and why should you upgrade to CakePHP 5?

CakePHP 5.0.0 was released on September 10th. The current version as of today is 5.0.3 (released Nov 28th and compatible with PHP 8.3 https://github.com/cakephp/cakephp/releases/tag/5.0.3). You might be asking yourself some questions related to the upgrade… here's what we've been recommending to our clients to do since version 5 was released. Leaving aside the obvious reasons for an upgrade, today we're going to categorize the decision from 2 different points of view: Your current CakePHP version, and your role in the project.

When should you upgrade? 

  We are going to use current CakePHP version as the main criteria: * If you are in CakePHP <= 2   * We strongly recommend an upgrade as soon as possible. If you are unable to upgrade, try to keep your PHP version and all the underlying dependencies as fresh as you can and isolate the application as much as possible. If your application is internal, consider using a VPN blocking all outside traffic. If your site is open to the public, consider using an isolated environment, hardened. Adding a web application firewall and a strict set of rules could also help to mitigate potential security issues. Even if CakePHP is very secure, the older versions of CakePHP, like  1 and 2  have a very old code base , and other vendors/ libraries could be a serious security risk for your project at this point.   * If you are in CakePHP 3.x   * The effort to upgrade at least to CakePHP 4.x should not be a blocker. We would recommend upgrading at least to the latest CakePHP 4.5.x. You can actually "ignore" the deprecations for now, you don't need to plan for upgrading your authentication/authorization layers just yet, focus on getting your project stable and up to CakePHP 4.5.x in the first round.   * If you are in CakePHP 4.x   * Upgrading to CakePHP 5.x is not an immediate priority for you.   * I would say, 2024 is a good time to start planning for an upgrade. Feature and bugfix releases for 4.x will continue until September 2025. Security fixes will continue for 4.x until September 2026. You have plenty of time to consider an upgrade, and take advantage of newer (and faster!) PHP versions.  

Why should you upgrade? 

  We are going to use your role in the project to provide some good reasons: * If you are a developer   * More strict types, meaning better IDE support and more errors catched at development time.   * New features in CakePHP 5.x will make your code more readable, like Typed finder parameters https://book.cakephp.org/5/en/appendices/5-0-migration-guide.html#typed-finder-parameters      * Quality of life features, reducing development time like https://book.cakephp.org/5/en/appendices/5-0-migration-guide.html#plugin-installer   * Compatibility with PHP 8.3 for extra performance & support   * If you are a manager   * Ensure your development team is forced to drop old auth code and embrace the new authentication/authorization layer https://book.cakephp.org/5/en/appendices/5-0-migration-guide.html#auth   * The new authentication layer will allow you to easily integrate features like single sign on, two factor authentication or hardware keys (like Yubikeys), as there are plugins available handling all these features.   * Get an extended support window. CakePHP is one of the longest maintained frameworks out there, upgrading to CakePHP 5 will keep your core maintained past 2026.   * Upgrade to PHP 8.3 and force legacy vendors to be up to date with the new version, this will also push your team to get familiar with the new PHP core features.   * If you are an investor, not directly related with the project day-to-day operations   * Secure your inversion for a longer period.   * Reduce your exposure to security issues.   * Send a strong message to your partners, keeping your product updated with the latest technology trends.   * Send a strong message to your team, investing in the upgrade of your application will let them know the project is aiming for a long term future.   In conclusion, upgrading to CakePHP 5 is a good move for 2024 whether you're a developer, manager, or investor. The version 5 is stable and ready to go. Staying current becomes not just a best practice but a strategic advantage.   If you are in doubt, feel free to contact us. We'll review your case (for free) and provide an actionable recommendation based on your current situation in the next business day.  

A quick CakePHP Local environment with DDEV

In the realm of web development, a seamless local environment is the bedrock for efficient and stress-free coding. Enter DDEV, a powerful tool that simplifies the setup process and empowers developers to dive into their projects with ease. In this blog post, we'll embark on a journey to demystify the process of setting up a local development environment using DDEV. Whether you're a seasoned developer or just starting in the world of web development, optimizing your local environment can significantly enhance your workflow.

Pre Conditions :

Install Docker https://docs.docker.com/get-docker/ and install DDEV https://ddev.readthedocs.io/en/stable/

Step 1: Create a new CakePHP project skeleton 

composer create-project cakephp/app myproject A new folder "myproject" will be created with a CakePHP project skeleton inside. Go to this new directory and proceed with the following instructions.

Step 2: Initial ddev setup

Run ddev config
This will do the initial ddev setup, press enter for all questions.  Run ddev auth ssh
This will add ssh key authentication to the ddev-ssh-auth container

Step 3: Adjust the settings

Inside "myproject" a new .ddev folder will be created, open config.yaml  and adjust there: php version, database and the database url environment.  For PHP:
php_version: "8.1"

For the database: database: type: mysql version: "8.0" For the environment variable: web_environment: - DATABASE_URL=mysql://db:db@db/db

Step 4: Start ddev

ddev start  This will spin up the project.

Step 5: Open your application

ddev launch This will open your project in a browser.   Once you have the application up and running, some useful commands you could run are:
  • ddev composer to execure composer
  • ddev mysql to get into the database
  • ddev ssh takes you into the web container.
In this link https://ddev.readthedocs.io/en/latest/users/usage/cli/ you can see more useful commands.   Hope you enjoy playing with DDEV!


We Bake with CakePHP